Updating your Shopify inventory with Airtable is one of the most common use cases that we see our clients implementing. You can update the inventory for a particular product/variant, track how much inventory you have in stock, share inventory information with vendors, or bulk update Shopify inventory as needed.
Before we show how to store and update Shopify inventory in Airtable using AirPower, it’s important to explain just how Shopify stores inventory quantities. In Shopify inventory quantities are related to variants, not products. This is always the case, even if you haven’t added variants to a product as Shopify always auto-creates a variant for a product in its own database. This inventory-variant relationship is important to understand as we set up inventory tracking/updates in Airtable.
AirPower supports Shopify’s various inventory quantity types. You can sync any inventory type from Shopify to Airtable; only the Available quantity can sync both ways (Airtable to Shopify and Shopify to Airtable). All other inventory types sync Shopify to Airtable only, including:
If you need to push an adjustment back to Shopify, do it via the Available quantity; everything else is view-only in Airtable and reflects Shopify’s source of truth.
This is the way to set-up inventory syncing if you have multiple variants per product, and therefore your variants live in their own table. AirPower allows you to set up individual columns to track the inventory quantity at each location where the variant is stored. So, for example, if you have three locations you can track a variant’s quantity at each location by modifying the relevant column data for the variant row.
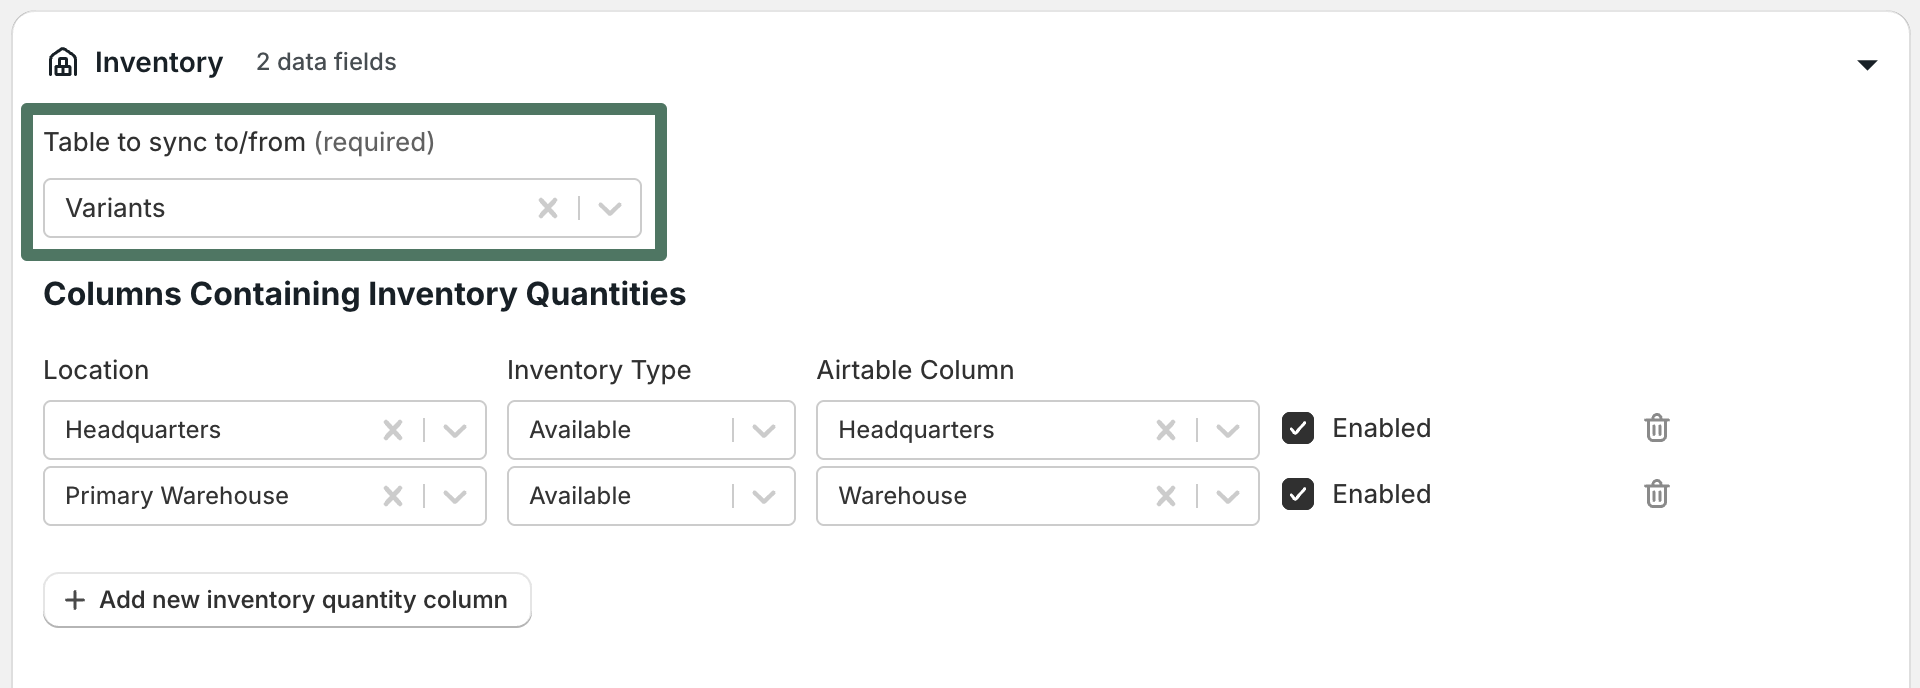
To enable this simply set the table that AirPower should sync inventory data to/from to be the same as the table where you are storing your variants (in the example screenshot below the table name is “Variants”). The moment you do this you will see a new section within the inventory configuration called Columns containing inventory quantities. Here you can specify the columns that will track a variant’s inventory at each location you have. You can create as many columns as you have inventory locations defined in Shopify. You’ll need to select the Location you’d like to sync for each column, and the name of the column in your table.
Our Expanded template base for integrating Airtable and Shopify is set up in this manner, with a single column to sync inventory quantity information.
This is the inventory sync set-up if you have only one variant per product, and therefore your variants live on the same table as your products. AirPower allows you to set up individual columns to track the inventory quantity at each location where the variant is stored. So, for example, if you have three locations you can track a variant’s quantity at each location by modifying the relevant column data for the variant row.

To enable this simply set the table that AirPower should sync inventory data to/from to be the same as the table where you are storing your products (in the example screenshot below the table name is “Products”). This should also be the same table where you are syncing your variant data. In other words, your inventory, variant, and product configurations should sync to the same table. The moment you do this you will see a new section within the inventory configuration called Columns containing inventory quantities. Here you can specify the columns that will track a variant’s inventory at each location you have. You can create as many columns as you have inventory locations defined in Shopify. You’ll need to select the Location you’d like to sync for each column, and the name of the column in your table.
Our Compact template base for integrating Airtable and Shopify is set up in this manner, with a single column to sync inventory quantity information, and inventory, products, and variants living on the same table.